How to Transfer Photos from iPhone to iPad and All Other Files–the Best Solutions Are Here
Apple got some of the most advanced technology today and iPhone and iPad are among their best devices which got all those latest technological features. Because of different uses and versions many users have got both iPhone and iPad and thus they need synchronizing their files between both devices so that they can use those files in any of those devices they want. But many users do not know how they can have those files on iPhone easily accessible on their iPad as well. Here in this article, I’ll show you details on transfer photos from iPhone to iPad in the first part and also other files like music, videos, contacts from iPhone to iPad in the second tip part.
Part 1: Transfer Photos from iPhone to iPad
Photos from iPhone to iPad can be transferred using Wondershare MobileTrans, Photo Stream and Wireless Transfer App. And Wondershare MobileTrans shall be the easiest way to fulfill that and it can also easily transfer other files like music, video, contacts and others.
# Solution 1: Wondershare MobileTrans
Steps are discussed below for photo transfer from iPhone to iPad using Wondershare MobileTrans in the easiest way with just one click. First let’s what Wondershare MobileTrans is and what it can do.
Transfer Photos from iPhone to iPad, easily and efficiently!
- Transfer photos from iPhone to iPad with just one click and quickly
- Not just photos. You can use it to transfer all other files like contacts, apps, messages, calendars, music, video and more.
- The best tool to manage your iOS devices in one place
Note: This is for Windows users. If you are using Mac, you can turn to Wondershare MobileTrans for Mac to help.


Now, let’s come to detailed steps.
Step 1: You will need to download and install Wondershare MobileTrans on your computer. Launch it and you will see the program’s primary window appearing as follows.
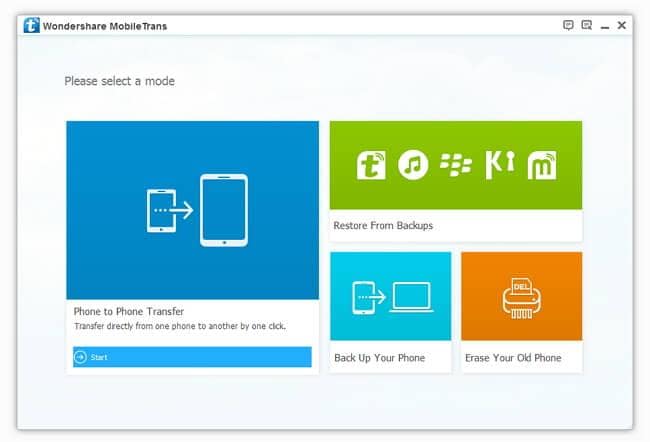
Step 2: Connect both of your iPhone and iPad to your computer. Make sure that the computer can regonize them correctly, or they won’t be detected by the program.
Step 3: Click “Phone to Phone Trannsfer” on the screenshoot above. Then you’ll see that both of your iPhone and iPad are displayed on the program’s window. To transfer photos from iPhone to iPad, you need place the iPhone on the side of left, saying “Source”, and the iPad on the right side for destination, just as shown below.

Step 4:Transferring photos from iPhone to iPad will be very easy then. Tick the checkbox of photos and click “Start Copy”. Now the transferring starts. You may need to wait for sometime before it finishes since your photos normally take some more space then contacts or other text files.
You can also select the checkboxes of a lot of other files such as SMS, apps, music, videos and more.

#Solution 2: Photo Stream
Here are how you can transfer photos from iPhone to iPad with Photo Stream.
Step 1: At first make sure that you are signed in to your unique account in the iCloud of both iPhone and iPad with same Apple ID. You can crate Apple ID from https://appleid.apple.com/
Now you need to Turn On My Photo Stream on your iPhone. Have a look on the image below which shows the steps-
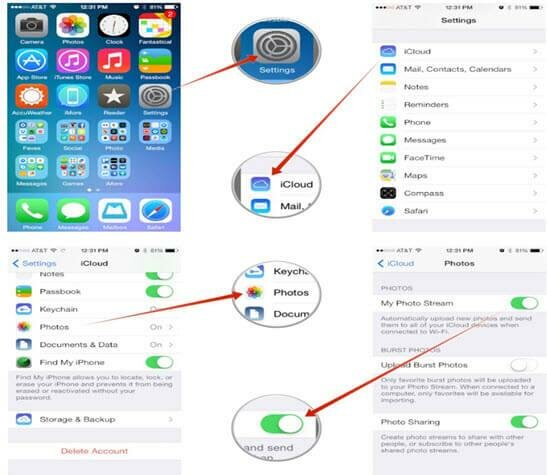
Step 2: Follow the steps as shown on the image above. Open Settings then open iCloud after that select Photos and then you will find another screen where you will have to Turn On My Photo Stream.
Step 3: Now, on your iPad do the following as shown on image below-

As shown on the image above, Click on Photos then select Photos and there select Albums where you will find My Photo Stream folder. Now you will see all photos of your iPhones are synced to your iPad.
#Solution 3: Wireless Transfer App
Steps are discussed below for photo transfer from iPhone to iPad using Wireless Transfer App–
Step 1: At first download and install Wireless Transfer App on both iPhone and iPad.
Remember, you must connect both iPhone and iPad to same wifi network to make this work.
Step 2: Now Run Wireless Transfer App on both iPhone and iPad.

Step 3: Now Tap Send Button on your phone screen and a new screen like the image on the right side will appear.
You will find two options ‘Computer’ & ‘iPod iPhone iPad’ on the screen where you’ll have to tap on latter one.
Step 4: Now from the new window select the photos and videos you want to send
And tap on Send button and the photos and videos will be be added to your iCloud.
Step 5: Now on your iPad’s Wireless Transfer App screen tap on Refresh Device and then you will see available devices. Tap on Receive from iPhone/iPad/iPod which will ask for Authorization on your iPhone and once you accept, your photos and videos will be transferred from your iPhone to your iPad.

Part 2: Tips to Transfer Music, Videos, Contacts and Others from iPhone to iPad
1 Transfer contacts from iPhone to iPad
You can easily transfer contacts from your iPhone to your iPad and to that you need to take help of 3rd party servers like iCloud, gmail etc. Here are the methods for transferring contacts using iCloud is discussed below- Of course, Wondershare MobileTrans will be the easiest way to get your files transferred with one click as illustrated above.
Step 1: At first navigate to Settings of your iPhone and you will find options as shown on the image of the right side. From the list you need to tap on iCloud and a new sub-menu will appear.

The menu will be like the image on the right side where you will have to sign in to your email account which you used to register for iCloud. Now as you see on the marked area of the image, turn the button next to Contacts from off to On
Step 2: Then you will be asked with two options Marge and Cancel. You will have to tap Marge and your iCloud will be ready to syncing contacts.
Step 3: Now go back to contacts and refresh it, and all your contacts will be synced to your iCloud.
Step 4: Now on your iPad, navigate to settings and sign in yo same email account which you used in iPhone. Once you do that then all your contacts will be on your iPad as well.

2 Transfer Purchased Music and Video from iPhone to iPad
You can also transfer your purchased music from your iPhone to your iPad very easily using iTunes application. Again, transferring music and video from iPhone to iPad will be very easy with the help of Wondershare MobileTrans. Check the introduction to it above.
Step 1: At first download and install iTunes on your PC/ Mac http://www.apple.com/itunes/download/.
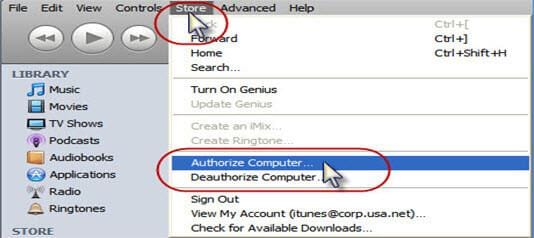
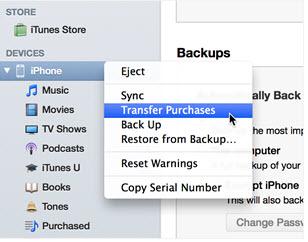
Step 2: Now connect your iPhone to your PC using the USB cable. Now open iTunes on pc and select Store from the options and you’ll see a screen then select Authorize Computer where it will ask you to enter your Apple Id and after entering it click Authorize and your device will be authorized.
Step 3: Now select your device on iTunes from the Device list and then select Transfer Purchases then all your purchased music and videos will be transferred to the authorized device.
Step 4: After that disconnect iPhone and connect iPad and then click download purchased music on the list and all your music will be downloaded to your iPad. This step will transfer only your purchased music but no other which you have copied to your device.
To transfer music which you have copied, you have to sign in and authorize device as shown earlier. Then you will see screen like the image on the right sided. On Media select Music.

A new screen will appear as the image shown below-

On the list under your device option click on Music Library and you will see your entire device’s music will be loaded on the screen. Now select particular music you want to transfer or select all if you want all the music to be transferred from your iPhone.

Now after selecting, click on Transfer selected to iTunes as shown on the image above and all your music will be transferred to the iTunes library.
Now disconnect your iPhone from PC and connect your iPad to the PC and you will see your device name on the iTunes screen.

Now select Manually Manage Music and Videos on the screen and then click Apply.
Now you will see a screen as shown below where you will have to select On This Phone.

Now click Music or videos on the left side of the screen. Now Drag and drop all the music and videos from the iTunes library to your iPad.
After that if you open music or videos folder, you will see all your music videos will be there on your iPad which you transferred.
3 Transfer Files (DOC, TXT, etc.) from iPhone to iPad
You can also transfer files such as DOC, TXT, etc. from iPhone to iPad using iTunes file sharing. But in order to do that, you will have to export your files to your PC first from your iPhone and then import those to your iPad from PC. Wondershare MobileTrans can also do that and ease you from any trouble. Check it out from above.
Detailed explanation given below-
Export a document to your PC
Step 1: At first open iTunes on your PC and connect your iPhone to your PC and select your device on the device list of iTunes window which was shown earlier.
Step 2: Now open the document you want to export and on the toolbar tap icon as shown on the image right from the list tap Share & Print.

Step 3: You will find another screen as you see on the image below. Choose Copy to iTunes from the list.

Step 4: Now a new window will appear as you see on the image below-

Use the options to select file types and then Drag & Drop your files from your iPhone to your PC.
Step 5: Now disconnect your iPhone and connect your iPad to your PC. Open iTunes and select your device. Then Drag & Drop files from your iTunes library to your iPad and your DOC, TXT etc. files will be available for use on your iPad as well.